How to make streaming audio recording comparisons more accurately
Most music streaming services do backend processing after you submit your music to them, and the purpose of that processing is to even out the volume of music playing on the platform.
This kind of processing is called “volume normalization”, and it’s really great.
It’s the technology that allows you to put a Miles Davis song recorded in the 1950’s right next to a modern Drake song that was digitally recorded much louder on the same playlist, and not hear a jarring volume change when switching between tracks.
And all of this happens in the background, transparently, without the music consumer even knowing it’s happening, for the most part.
Downsides of volume normalization
A downside of taking this approach is that, for your average music consumer, volume normalization obscures how your music actually sounded when it left the hands of your mastering engineer, but before it got submitted to the streaming service.
How the music actually sounded when it left the studio can sometimes be different than how it appears if you’re listening as the end consumer, especially when you’re listening on a digital streamer.
If you’re the artist making the music, that’s important information to know, because:
If you try to compare your music to how your favorite artists sound on a streaming platform like Spotify, you won’t be making an apples-to-apples comparison if you keep the default settings enabled on your streaming app. This could lead to you drawing inaccurate conclusions from that comparison, and then giving bad direction to your recording team.
Making more accurate audio comparisons using Spotify
So, here’s how to do these kinds of comparisons yourself, more accurately:
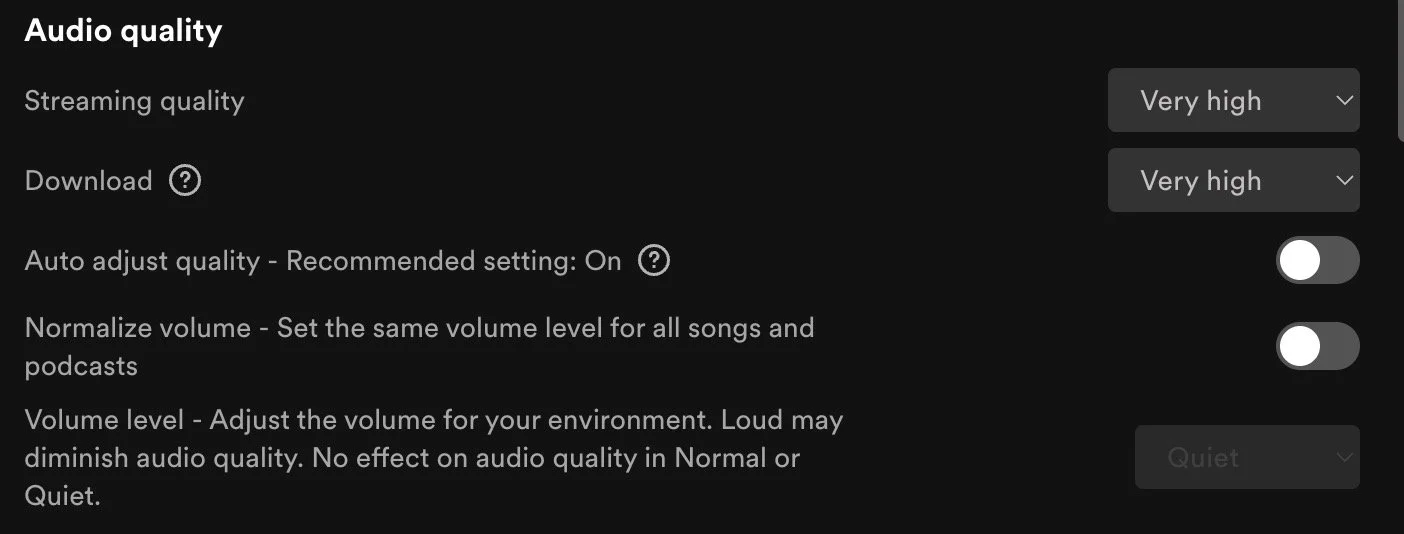
Go into your Spotify settings, turn off “volume normalization”, and then max out your streaming quality. The settings should look like this:
How to turn off volume normalization on Spotify.
Once this is done, restart the app-the changes won’t take effect until you do this.
Note that these options will only be available on the computer app, not the mobile app.
Once you’ve restarted the app, you should now hear much more obvious volume and style differences when switching between tracks.
Turning off this consumer convenience feature might make it a little more annoying to listen to music on Spotify: you’ll need to touch the volume knob more often as the music plays.
But, if you’re listening as an artist, this is great. What you’re now hearing is much closer to how the finished masters sounded when the artist approved them, but before they were submitted to the streaming platform.
Without the streamer adjusting levels so much on the backend, you can make clearer artistic choices on the style of loudness that you’d like to hear on your own record.
One caveat here: you can’t turn off the backend processing 100% on most streamers. You can modify your settings to strongly reduce any audible effects, but the only way to get a true apples-to-apples comparison would be to work off of the actual production audio files.
Practical album comparisons using these new settings
Here’s some fun comparisons to try after you’ve made these settings changes.
Compare Snail Mail’s first album “Lush” to their later album “Valentine”.
You should notice some pretty clear differences in production style between these albums now.
For an even more stark comparison, put Dear Nora’s first album “Mountain Rock” next to their later album “Skulls Example”.
Now that we’re making more accurate comparisons, the question becomes: which style of loudness do you prefer, and why?
Expanded processing: album normalization and track normalization
Fun fact: many streamers have expanded their backend processing toolset to include “album normalization” and “track normalization” as well.
The purpose of using this kind of processing: when you play back a track as part of an album (with shuffle off), it will play at a certain volume defined by the flow of the album, as the artist intended it.
But, when that same track comes along as part of a playlist or shuffle play, it will play back at a different volume to more closely match the track that came before it.
When you’re producing your music, album volume flow and track volume flow is something your mastering engineer should definitely be helping you with. And, you should also be thinking about this and making some creative decisions regarding album flow as the artist, before your album heads into mastering.
It’s important to note that the amount of volume normalization differs between each different streaming service: some of them apply a lot (like Pandora), others apply none at all (like Bandcamp).
This is one reason mastering engineers like myself have jobs: we specialize in these types of delivery specifications, and we also have the specialized gear and expertise needed to make sure your music sounds amazing and consistent across all of the different playback mediums.

